
Welcome
Acrea turns your phone into a full land-measurement and surveying toolkit. Measure area and distance by tapping the map or walking a boundary, organise your parcels into categories and groups, run professional tools like COGO traverse and parcel subdivision, and export survey-grade PDFs and CAD/GIS files — even with no signal in the field.
This guide is ordered from the basics to the advanced. Many features can be reached more than one way — each section lists every entry point under a “How to get there” callout. Tools marked Pro require an Acrea Pro subscription; everything else is free.
Each feature below has its own screenshot slot, so you can showcase exactly what it looks like in the app. A note on accuracy: Acrea uses your phone’s GPS and is intended for estimation, planning and field reference — not a substitute for a licensed survey. See Settings → Scope & disclaimer in the app for the full statement.
Getting Started
The first time you open Acrea, a short onboarding walks you through what the app does — measuring boundaries, walk-to-measure, organising with categories, viewing all your sites, the pro tools, and offline surveying — and then asks for location access so the app can show where you are and place GPS points.
Location access
Acrea needs location permission to centre the map on you and to drop GPS-accurate vertices. Your location stays on your device and is never shared. If you skip the prompt or later turn it off, the map shows a banner and you can re-enable it at any time. Acrea distinguishes between your device’s GPS being switched off and the app’s permission being denied, and guides you to the right toggle for your situation (the path differs on iOS and Android).
How to get there
- Granted (or declined) during first-run onboarding.
- Re-enable from the map banner that appears when location is unavailable.
- Settings → Location access shows the current status and opens a guided fix.
The map screen at a glance
This is your home base. The key controls are:
- Measure button — the prominent button that opens the “What do you want to measure?” sheet (distance, area, or walk). This is the start of every measurement.
- Control buttons — search, saved-sites overlay, map style, compass, offline maps, and settings. On phones these sit in a scrollable bar along the top; in landscape they form a vertical rail.
- Recenter & GPS accuracy — the recenter button snaps the camera back to your location, and a live accuracy chip (for example “±3.1 m”) shows how good your current GPS fix is. On phones these dock at the bottom-right.
- Speed & heading — while you move, the app reads your speed and heading so you can orient yourself on site.
The Map & Finding Places
Before you measure, you’ll often want to get to the right spot and pick the right base map.
Search for an address or coordinatesFree
Tap the Search button to find a place. The geocoder locates addresses, landmarks and place names, and you can also paste raw coordinates to jump straight to a point. Recent searches are kept so you can return to them quickly. Picking a result flies the map to that location.
How to get there
- Search button in the map controls.
- Search is also available on the “choose an area to download” screen when setting up offline maps.
Map stylesFree
Tap the Map style button to switch base maps. The available styles depend on the map engine in use:
- Google (default, free): Satellite (imagery with labels), Aerial (pure imagery, no labels), Terrain (topographic relief), and Standard (clean street map).
- Mapbox (Acrea Pro): a richer catalogue — Explorer, Outdoors (terrain, trails & contour lines), Satellite, Midnight (low-glare dark map), Daylight, and Streets.
Everyone starts on Google for its sharp satellite imagery. Acrea Pro members can set Mapbox as their default map (which unlocks the Mapbox style catalogue and is also what offline tiles are viewed through).
How to get there
- Map style button in the map controls.
- The picker automatically shows Google or Mapbox styles depending on your active engine.
Tap a place for detailsFree
Tap any empty spot on the map to drop a pin and open the place panel. It reverse-geocodes the address, shows the coordinates in your chosen format (with altitude where available), and gives you quick actions: Copy the coordinates, Share the location, get Directions, or Save it to your Places.
How to get there
- Tap any empty point on the map.
- Tip: with the saved-sites overlay on, tapping a saved shape selects it instead of dropping a pin (see Saving & Organising).
Saved places & directionsFree
Saving a place from the place panel files it under the Places tab of the Saved hub, separate from your measurements. From a place you can also open turn-by-turn Directions with a route line and ETA. Directions are free.
Measuring Land
Every measurement starts the same way: tap the Measure button to open the “What do you want to measure?” sheet, then choose Distance, Area, or Walk. (The same sheet has a shortcut into your Saved sites.) Results are shown live in the measurement panel — area in acres, hectares, m², perches or square feet, and perimeter/distance in your chosen unit.
Tap-to-measureFree
The fastest method, and great for measuring remotely from satellite imagery. After choosing Distance or Area, tap the map to drop vertices around the boundary. The panel updates instantly with the running area and perimeter. Use this to estimate a parcel you can see but aren’t standing on.
Drop a GPS point (with averaging)Free
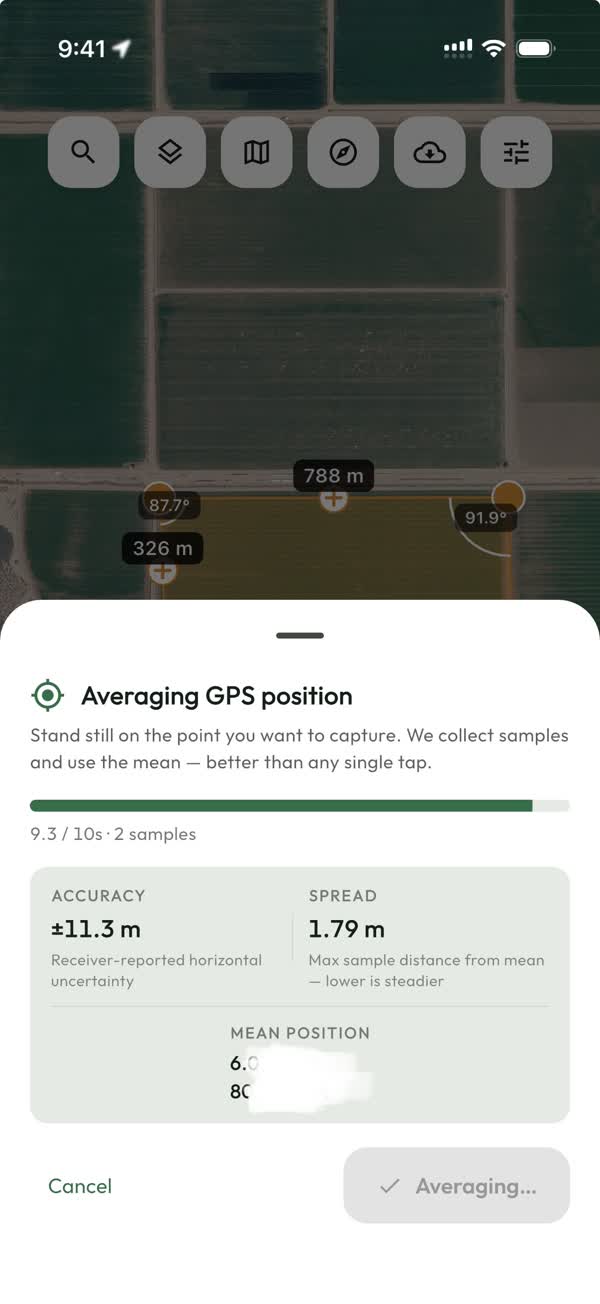
When you’re standing on a corner, tap Drop GPS point in the measurement panel’s tool strip to place a vertex at your current location. For critical corners Acrea averages multiple GPS samples over a few seconds to compute a tighter fix — the “use averaged point” action stays disabled until enough samples have been collected, so a single stray reading can’t be committed.
Walk-to-measurePro
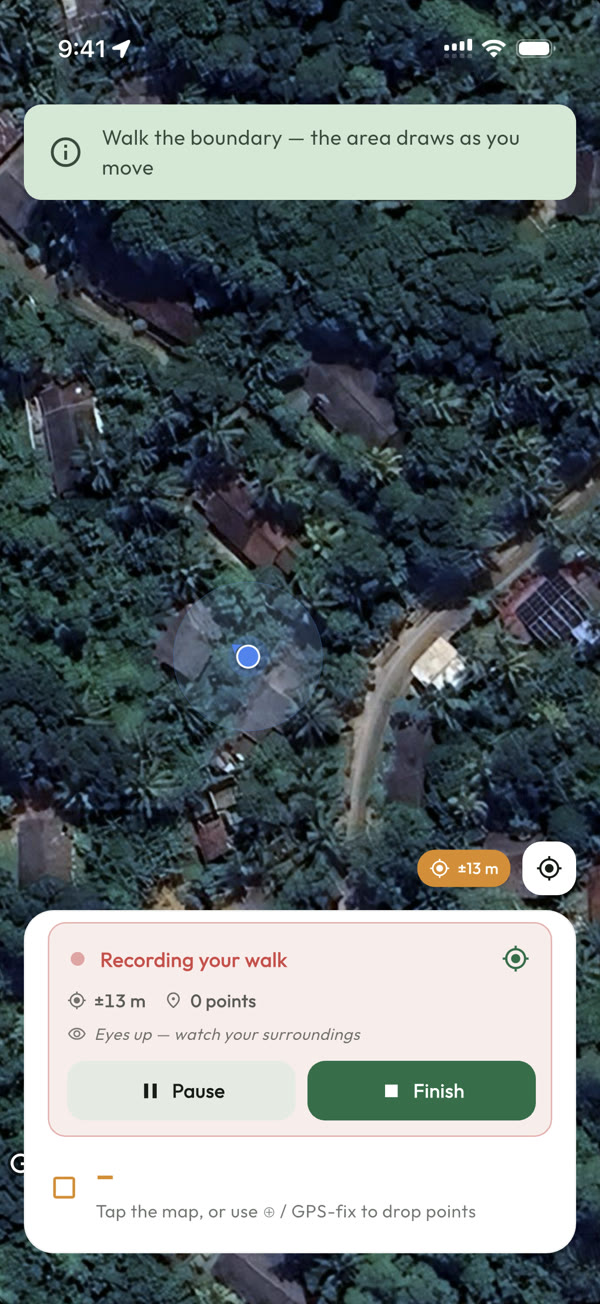
For fields, parcels and irregular sites too large to tap, choose Walk (or tap the walk tool in the panel). Acrea records the boundary as you physically walk it, dropping a GPS vertex roughly every few metres and drawing the polygon and area live. Accuracy and distance gates keep the trace clean so GPS drift doesn’t scribble.
- A first-time walkthrough explains how it works, why accuracy matters, and best practices.
- A ready state shows live GPS accuracy so you can wait for a good fix before starting.
- Recording is foreground-only — keep Acrea open in hand; locking or pocketing the phone pauses the run. The screen stays awake so the OS doesn’t throttle GPS.
- Controls: Pause/Resume, a Follow-me camera that keeps you centred at a close zoom, and Finish. While recording, the panel collapses to just the essentials so a stray tap can’t change the run.
How to get there
- Measure button → Walk.
- Walk tool in the live measurement panel’s tool strip (while building a measurement).
Live readouts & closureFree
As you build a measurement the panel shows the live area/distance, the point count, a per-segment breakdown (tap to expand), and a closure indicator that flags how well an area’s boundary closes back on itself (misclosure). Edits auto-save to a recoverable draft, so an unsaved, in-progress measurement survives an app kill or crash and is restored on next launch.
Editing & Precision Tools
While a measurement is on the map you can refine it point by point, or build it from precise field data instead of taps.
Moving & inserting pointsFree
- Move a vertex: long-press a point to raise a large drag handle pinned to the exact spot, then drag — the point follows your finger 1:1 and stays glued as you pan, zoom or rotate.
- Insert a point: tap a “+” midpoint handle on an edge to add a vertex between two existing ones.
- Undo / Clear: step back the last point, or clear the whole measurement, from the panel’s action row.
Precise coordinate entryPro
Tap a vertex to open its editor and type exact coordinates — ideal for placing deed corners to sub-metre precision. You can also add a brand-new point by coordinates from the panel’s Add point by coordinates tool.
COGO traverse legsPro
When you don’t have GPS or clear imagery, build a boundary from a deed or plan. Open Traverse entry and enter precise bearings and distances leg by leg (for example N 45° E for 100 ft). Acrea plots the boundary line by line from your coordinate geometry.
How to get there
- Traverse tool in the live measurement panel’s tool strip.
- Coordinate entry: tap any vertex, or use “Add point by coordinates” in the tool strip.
Cut-outs (holes)Pro
Need to exclude a pond, building or easement from an area? With at least three points placed, tap the Cut-out tool and draw an inner ring inside your boundary. Acrea subtracts that area from the total automatically. Tap “finish cut” to close the hole.
Curved edges (arcs)Pro
Not every boundary is straight. Bow any edge into a true circular arc to trace cul-de-sacs, road right-of-ways, riverbanks and rounded frontages. Tap the Curve tool (the curved-line icon) in the measurement panel’s tool strip to turn on curve mode — it appears once the measurement has at least one edge, and tapping it again (“Done curving”) turns it back off. In curve mode, every edge grows a handle at its midpoint, and there are two ways to shape it:
- Drag to bow it: drag an edge’s handle and the edge bows into an arc that follows your finger. How far you pull sets how deep the curve is; which side you pull sets the curve direction.
- Type an exact radius: tap the handle to open the radius sheet — enter a radius in your distance unit and pick a curve direction (Left or Right). The sheet previews the resulting arc length and central angle live as you type. Tap Apply curve to commit, or Straighten to drop the curve and make the edge straight again.
The smallest radius an edge accepts is half its length (a semicircle) — the sheet flags anything tighter. Curves are carried through everywhere the geometry goes: the arc’s radius, arc length and central angle appear in the metes-and-bounds legal description and the PDF report, and the curved area is what feeds parcel operations like union and split.
How to get there
- Curve tool in the live measurement panel’s tool strip (available once the measurement has an edge). Tap to toggle curve mode on/off.
- In curve mode: drag an edge’s midpoint handle to bow it, or tap the handle to enter an exact radius and direction.
Angle indicatorsPro
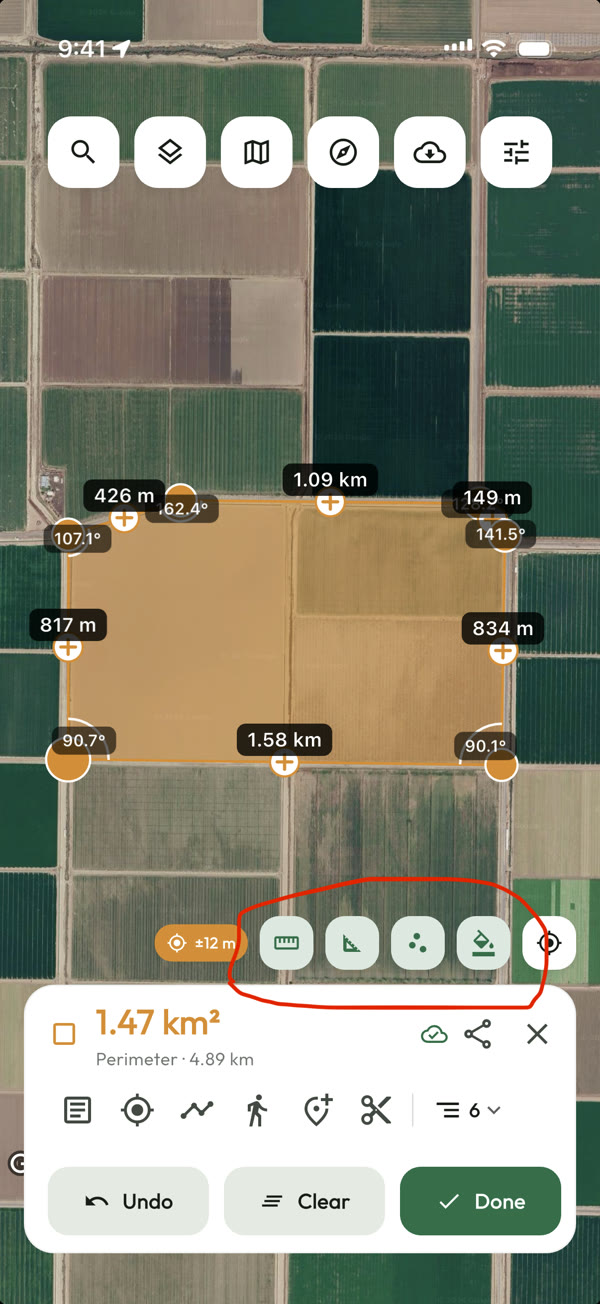
Interior angles are drawn as protractor-style arcs at every corner, with the value in degrees inside the wedge. The arc scales with the edge length so it reads consistently at any zoom. Near-straight and near-coincident corners are skipped to avoid clutter. Angles show on both live and saved measurements.
Distance & angle label togglesFree
Two floating toggles next to the recenter control independently show or hide the per-edge distance labels and the angle arcs, so you can trim clutter on a busy parcel. They appear only when a measurement is on the map and the choice persists across sessions. Distance labels are free; the angle toggle is an Acrea Pro feature.
Saving & Organising
Once a measurement is done, save it, name it, and file it so your portfolio stays tidy. Free users can save up to a handful of measurements; Acrea Pro removes the cap.
Saving a measurementFree
Tap Save in the measurement panel. The save sheet pre-fills a name from reverse-geocoding and lets you assign a category and notes in the same step. After saving, the measurement appears in the Saved hub and on the map (when the overlay is on).
The Saved hubFree
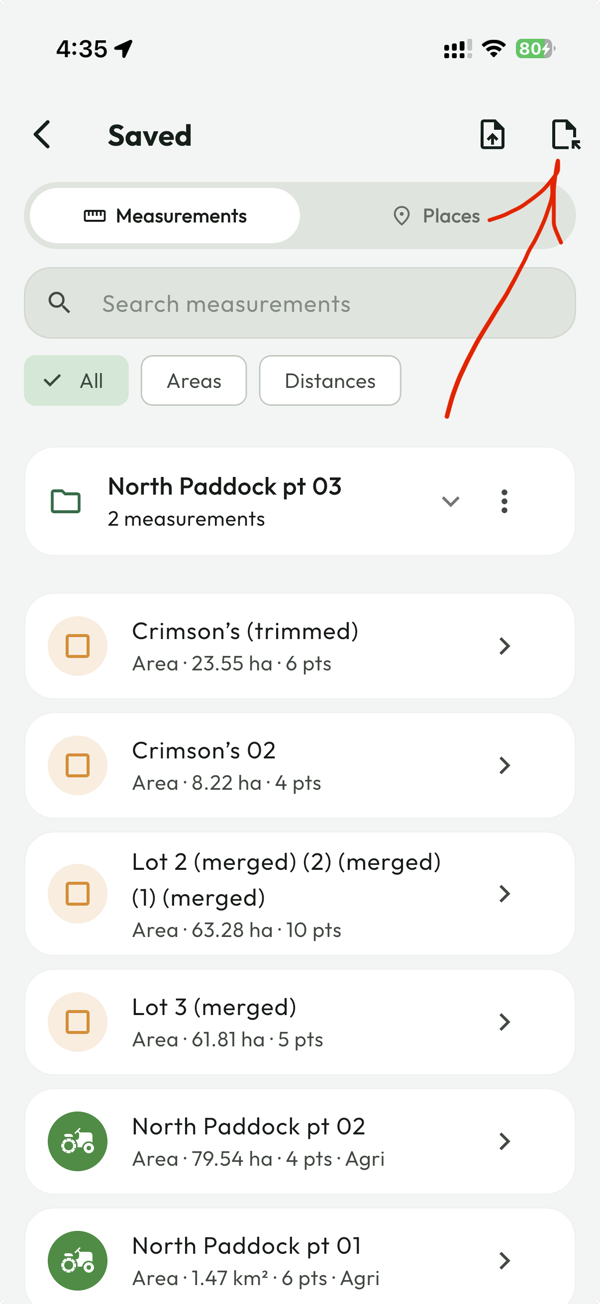
The Saved hub has two tabs: Measurements (your areas and distances) and Places (pins you saved from the map). From the hub app bar you can also import a file or export everything at once.
How to get there
- Measure button → Saved shortcut.
- “Saved” / layers controls on the map.
- Open straight to the Places tab from a saved-place link.
Saved-sites overlayFree
Toggle the saved-sites overlay (the layers button) to draw all your saved parcels on the map at once, each in its category colour — your whole portfolio at a glance. With the overlay on, tapping a saved shape selects it: the carousel scrolls to its card and the map highlights it (overlapping parcels resolve to the smallest under your finger; thin distance lines get a forgiving tap target). Opening a shape for editing temporarily hides the overlay so the surrounding parcels don’t clutter your work.
The carousel & detail screenFree
A focused saved site shows a card in a carousel with its value and per-edge labels. Each card has a quick Edit (pencil) shortcut and a ⋯ menu; tapping the card opens the full detail screen, organised into Details (category, notes), boundary segments, vertices, and Export & share.
CategoriesFree
Colour-code parcels by land type — residential, agricultural, and so on. Category badges show in the list and on the map overlay. Create and manage categories, and assign them at save time, on the detail screen, or from a measurement’s menu.
How to get there
- Settings → Organisation → Categories to create and manage.
- Assign on the save sheet, on the detail screen’s category card, or from a measurement’s ⋯ menu.
Rename, notes, duplicate & delete
- Rename Free — from the detail screen’s ⋯ menu.
- Notes & category Free — edit inline as tappable cards on the detail screen.
- Duplicate Free — clone any area or distance from the card’s ⋯ menu or the detail screen. The copy keeps the geometry, category and notes and drops straight into move mode so you can drag it off the original.
- Delete Free — swipe a row in the list or use the detail screen; a confirmation sheet guards it.
GroupsPro
Bundle related measurements into a group, shown as a collapsible card at the top of your saved list with members nested under it. Groups are created automatically when you split, subdivide or merge a parcel (so a parcel’s whole subdivision history stays together), and you can also build them yourself. From a group’s menu you can rename, recolour, or ungroup it (which keeps the measurements). Move a measurement into or out of a group from its menu or detail screen, swipe a member to delete just it (or the whole group), and drag a member’s handle to reorder. Grouping is an Acrea Pro feature.
Coming soon: tap a group to open it. It shows the group’s total area and length and every measurement in it, each opening its own detail, plus Show all on map, which frames the whole group at once so a subdivision’s lots can be seen side by side. The chevron still expands the group in place.
Account, Sync & Teams
Acrea works completely without an account, and always will — measurements live on your device and are yours whether you sign in or not. An account adds two things on top: your work follows you to a new phone, and a crew can share one set of jobs.
Signing in, cloud sync and Teams arrive in an upcoming app update. The parts marked Coming soon describe how they will work once it is out.
Your safety net, without an accountFree
Deleting a measurement offers an immediate Undo, and anything you miss goes to Recently deleted for 90 days with its geometry intact — restore it instead of walking the boundary again. Ninety rather than the usual thirty because survey work is seasonal: a parcel deleted at the end of one season and missed at the start of the next would otherwise be gone.
A backup file holds your entire portfolio — every measurement, place, category and group — in a single .acrea file you keep yourself, anywhere you like, and restore on any device. It isn’t linked to an account and doesn’t need one; it is a different thing from cloud sync. Restoring never removes anything: it merges, keeping the newer copy where both sides have edited the same item. Both are free, for everyone.
How to get there
- Settings → Data for Save backup file, Restore from backup file and Recently deleted.
- The Undo action in the toast shown right after a delete.
Signing inFreeComing soon
Sign in with Apple or Google — no password to invent or remember. Signing in never changes what is already on your device. If there are measurements on the phone that aren’t in your account — work from before you signed in — Acrea asks before adding them, and uploads nothing until you say yes.
Signing out asks what should stay on the phone. Anything safely in your account is removed by default and comes back when you sign in again. Anything that isn’t — changes that haven’t synced, or work that was never uploaded — is kept by default, the sheet says how much, and it offers to sync first when that would help. Team work is always removed from the phone, because it belongs to the team.
Change the name and photo your team sees beside your work from Edit profile on the account screen.
Cloud syncProComing soon
With Acrea Pro, your measurements, places, categories and groups sync to your account — reinstall the app or switch phones and everything comes back. Every workspace you belong to comes down, not only the one you have open, so your teams are ready on a new phone too.
If your Pro ends, nothing already in the cloud is locked away. Sign in on any device and your work still downloads. Only backing up new changes to your Personal workspace needs Pro: the app says so, counts the changes waiting on the device, and uploads them as soon as you subscribe again.
Acrea is offline-first, not cloud-first. Nothing in the app ever waits on a network round trip: every save, edit and delete is written to your device immediately and uploaded later, whenever there is signal. You can measure all day in a valley with no bars and never see a spinner, a retry, or an error. Deletes travel too, so a parcel removed on one phone does not reappear from another.
The Saved hub shows the current state at a glance: how many changes are waiting, when a sync is running, and whether everything is safely up. No signal is shown plainly as “Waiting for connection”, with how many changes are safe on the device — it is a normal working condition, not an error, and sync picks up on its own as soon as a connection is back. Pull down on the Saved hub to sync right away; anything that arrives appears in the list without leaving the screen.
You can turn cloud sync off for a phone at any time. Nothing is uploaded or downloaded while it is off, and nothing is deleted; turn it back on and it catches up.
How to get there
- Settings → Data → Cloud sync for the switch, what sync is doing, and Sync now.
- Tap the sync line at the top of the Saved hub, or Cloud sync & data on the account screen, to open the same place.
If the same measurement is edited on two devices while both are offline, the most recent edit wins — except for the boundary itself. If the shape was changed in both places, Acrea keeps both and marks one “conflicted copy” rather than silently discarding a boundary somebody walked.
TeamsProComing soon
A team is a shared workspace. Everyone in it measures into the same set of jobs, and the work syncs between you — no exporting, emailing or re-drawing. Your Personalworkspace always stays separate and private; switching between them is one tap on the workspace chip at the top of the Saved hub.
Create a team from that same chip, then invite people with a link you can send however you like. An invite can be locked to one email address or left open as a shareable link, and it expires. Before your first team, the app walks you through how teams work.
The people you invite don’t need a subscription of their own: while they work in the team they get the Pro tools, covered by the owner’s Acrea Pro. It doesn’t unlock Pro in their own Personal workspace.
Roles & seatsProComing soon
Everyone you invite joins in one of four roles:
- Owner — full control, including inviting, removing people and deleting the team. A team always keeps at least one owner; the last one cannot leave or step down until somebody else is promoted.
- Admin — can invite and manage members.
- Can edit — measures and edits shared work.
- View only — sees everything, changes nothing. Viewers are free and unlimited, so a client, an office or an inspector can follow a job without taking a seat.
Only contributing roles use a seat. The team screen shows seats used out of seats available, and tells you before you send an invite that would exceed them.
If a team’s subscription endsProComing soon
A team runs on its owner’s Acrea Pro. If that ends, the team becomes read-only for everyone in it, the owner included, until it is renewed. Nothing is deleted: every measurement, place and group is still there to view on the map, export, share as a link, or copy into your Personal workspace.
While a team is read-only, nobody can add or change its work, invite people, or rename it. Owners and admins can still remove people and revoke invites, anyone can leave, and the owner can delete the team. Invite links that haven’t expired work again as soon as the team is renewed, and any changes still waiting on someone’s device upload then too.
Leaving and deletingProComing soon
Leaving a team removes your access to its shared measurements; work in your Personal workspace is untouched, and nothing is deleted from your device. An owner can rename or delete the team from the team screen — deleting removes it for everyone, though measurements already on someone’s device stay there.
Deleting your Acrea account removes your account, your profile photo and everything stored in the cloud, including any team where you are the only owner. Teams with another owner carry on without you. Your data is erased from the phone too unless you choose to keep it there, and you can save a backup file first.
Signed in, Delete all Personal data in Settings → Data deletes your Personal workspace on the phone and in your account, and never touches team work. Deleted measurements stay in Recently deleted for 90 days.
How to get there
- The workspace chip at the top of the Saved hub — switch workspace or create a team.
- Settings → Account to edit your profile, sign in, sign out or delete your account.
Parcel OperationsPro
Acrea Pro turns saved parcels into editable geometry you can move, split, subdivide, merge and trim — with a live preview before you commit. When an operation produces multiple pieces, they’re filed together in a group named after the original, and the original is archived (hidden from your lists but not destroyed). Areas always sum back to the parent.
Save the measurement first. Every operation here acts on a savedparcel, so they live on the saved card’s ⋯ menu and on the detail screen — an unsaved, in-progress measurement has no ⋯ menu and can’t be split or subdivided. Finish and Save your measurement, then reopen it from the carousel or the Saved hub to run these tools. (Split, Subdivide and Trim apply to areas only.)
MovePro
Reposition a whole measurement two ways: drag a large handle on the map (your finger drives the shape live, no jump on release), or enter a precise bearing + distance offset (azimuth like 45 or quadrant like N45E, in metres or feet). A compact move bar hosts Values, Cancel and Done.
How to get there
- Card ⋯ menu or detail screen → Move.
- Automatically entered right after you Duplicate a measurement.
SplitPro
Divide an area into two parcels with a clean cut. Tap two crossing points across the boundary — a live preview shows both resulting parcels with their side-by-side edge lengths and each side’s area. For precision, tap a crossing to place it a set distance from a corner, at an edge midpoint, by exact coordinates, or solve it to hit a target area (“carve a 1-acre lot”); long-press a crossing to drag it live. Split commits the two parcels into a group named after the original; any cut-outs are reassigned to whichever side contains them.
How to get there
- Card ⋯ menu or detail screen → Split (areas only).
Auto-split (subdivide into a grid)Pro
Subdivide a parcel with an interactive grid — by count (rows × columns) or by size (target lot width and/or height in your distance unit) — and rotate the grid to any angle. Lots update live, each labelled with its area. Subdivide commits them as a numbered set of “Lot” measurements in a group.
How to get there
- Card ⋯ menu or detail screen → Subdivide (areas only).
MergePro
Select two or more areas and Merge them. Adjacent or overlapping parcels fuse into one (combined area, holes preserved); parcels that don’t touch are kept separate and filed together in a group — the app tells you which happened. You can re-merge split slices because group members are selectable too.
How to get there
- In the saved list: long-press a measurement to start selection, tick rows, then Merge.
- On the map: long-press a parcel, then tap others to add, then Merge.
TrimPro
Subtract one parcel from another. Choose Trim, then tap the parcel to subtract. The result previews live — a reshaped parcel, a parcel with a hole, or several pieces if the cut goes clean through — before you commit.
How to get there
- Card ⋯ menu or detail screen → Trim.
Field CompassPro
A field compass that floats as a draggable, pinch-resizable dial over the map, so you can read a tilt-compensated magnetic bearing while still seeing — and measuring on — the map underneath. Tap full screen for the complete readout: a magnetic- interference warning, live coordinates, altitude, GPS course, and the “not survey-grade” disclaimer.
A first-use walkthrough explains magnetic north, figure-8 recalibration, and the pinch/drag/full-screen controls. The magnetometer runs only while the compass is shown (no always-on sensor drain), and the app degrades to a clear “compass unavailable” state on devices without a magnetometer.
How to get there
- Compass button in the map controls (it becomes a “close compass” button while the dial is up).
Importing Data
Bring your existing parcels into Acrea from any standard geo or CAD file. Import is completely free — no paywall and no saved-measurement cap — so you can migrate your entire portfolio from another platform without friction.
Supported formatsFree
KML, KMZ, GeoJSON, CSV, DXF, or Shapefile (.zip). A first-run intro explains the feature, then a file picker lets you choose from Files, iCloud, Google Drive, or any app extension.
Preview & selectFree
A preview screen lists every detected measurement with its name (editable), type, computed area or distance, and vertex count. Tick which ones to keep, assign a batch category, then Import. Degenerate or unrecognisable features are surfaced as warnings without failing the whole file.
How to get there
- Saved hub app bar → import icon.
- The empty measurements state.
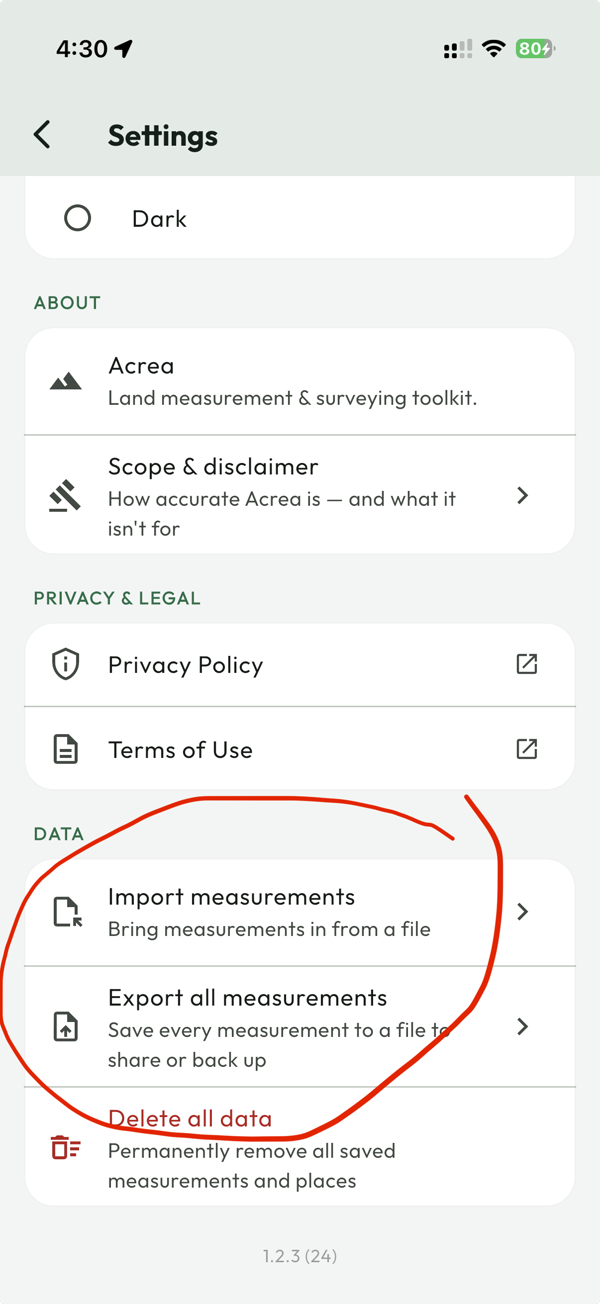
- Settings → Data → Import measurements.
Exports & Reports
Acrea is built to plug into your desktop workflow and client deliverables. Every GIS and CAD format is free, single or bulk — your measurements are yours, and getting them out is never the thing you pay for. PDF reports and the legal description are Acrea Pro.
Branded PDF reportsPro
Generate a survey-grade PDF from the field via the report builder. Customise the title and subtitle, choose which summary rows to include (computed and custom fields), and toggle sections — boundary segments, vertices, site map, disclaimer, and notes. Add your company logo, name and contact line for the header, or keep the default Acrea wordmark; your branding and section choices are remembered. The report includes a static site map, total area and perimeter, multi-format coordinates for every vertex, a site-centroid reference coordinate, the coordinate datum (WGS 84 / EPSG:4326), and a full metes-and-bounds legal description. It works on unsaved drafts too.
Legal descriptionPro
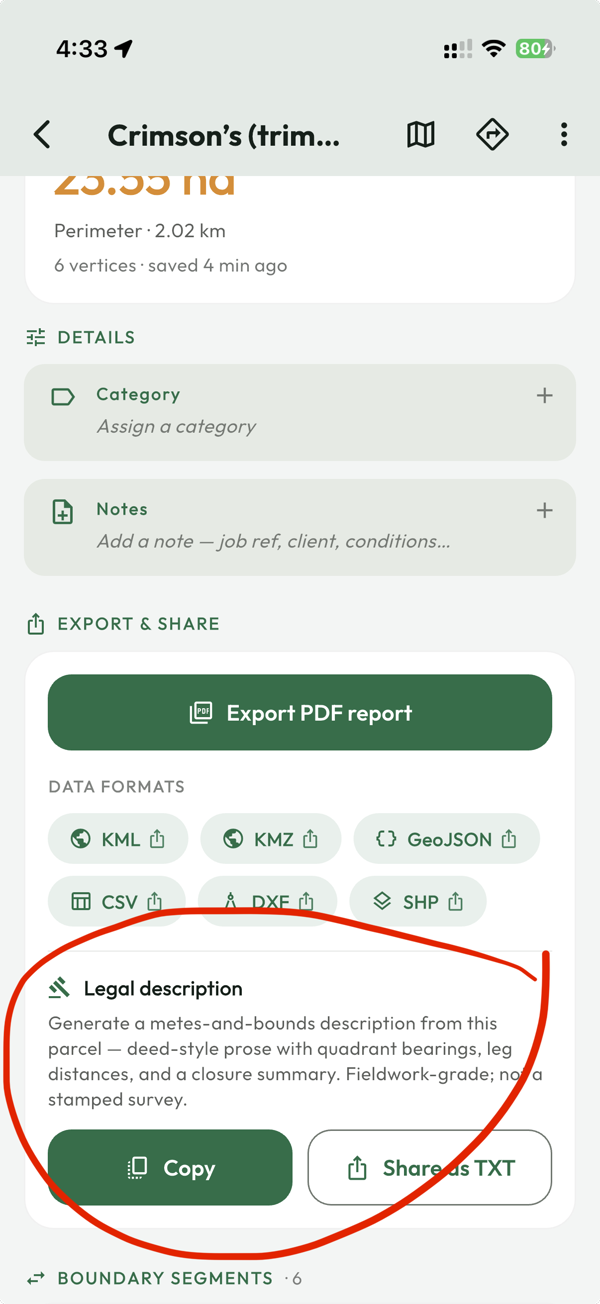
Generate a metes-and-bounds legal description for an area and copy it or share it as a text file — available on the detail screen beneath the export actions.
GIS & CAD formats (single measurement)Free
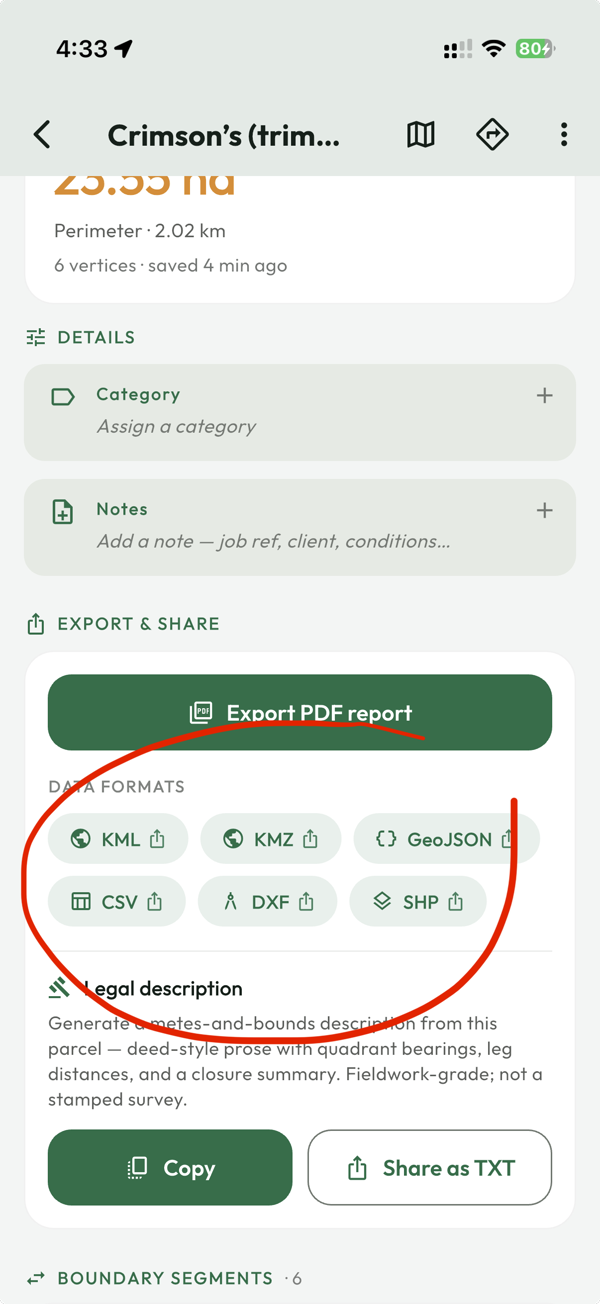
From a saved measurement’s detail screen you can export to:
- KML / KMZ — Google Earth, QGIS, ArcGIS (KMZ is compressed).
- GeoJSON — web maps, QGIS, developers.
- DXF — AutoCAD, Civil 3D, BricsCAD.
- Shapefile — ArcGIS, QGIS, land registries.
- CSV — spreadsheets and CAD point import (round-trip importable).
Bulk exportFree
Export any selection of measurements — or all of them at once — as a single multi-feature file in any of the six formats. A format picker shows each option with a one-line “best for” description. The output is one combined file: a GeoJSON FeatureCollection, a KML/KMZ Document with N Placemarks, sectioned CSV, DXF with N polyline entities, or a multi-record Shapefile bundle.
How to get there
- Saved hub app bar → Export all (upload icon).
- Long-press measurements in the saved list to enter selection mode, then tap Export.
- Map selection mode also offers the same Export button.
- Single measurement: the Export & share card on the detail screen.
Share a map imageFree
From the measurement panel, share a clean snapshot of the parcel. Acrea auto-frames the shape and centres it in a 4:5 portrait so it displays large in messaging apps, and attaches a caption with the measured value plus a tappable Google Maps link to the parcel’s centre.
Offline MapsPro
Surveys often take you beyond cell range. With Acrea Pro, no signal won’t stop your work.
Download a regionPro
Before heading out, open Offline maps, tap Choose an area on map, and frame the region (you can search to jump there first). Name the area and download its tiles — including high-resolution satellite imagery. The download button is disabled without an internet connection (downloading needs it), and very large areas are flagged so you can tighten the box.
Use it in the fieldPro
Once downloaded, you have full access with zero connection: view the map, drop GPS vertices, measure, cut out holes, and save jobs. Tap a completed region to preview it — “View on map” switches to Mapbox and frames the area, with a one-tap strip to return to online mode. Swipe to delete a region (with confirmation).
Note: downloading is engine-independent and works while Google is displayed, but viewingdownloaded tiles uses the Mapbox engine.
How to get there
- Offline maps button in the map controls.
Settings Reference
Open Settings from the map controls. Everything you can configure:
- Units — Area (Automatic, m²/km², hectares, acres, perches, ft²), Distance (Automatic, km, miles, metres, feet), and the default Coordinate format (Decimal degrees, DMS, MGRS, UTM, Plus Code).
- Organisation — manage Categories (create, colour, edit, delete).
- Data — Import measurements from a file.
- Location access — current status and a guided fix when GPS or permission is off.
- Membership — upgrade to Acrea Pro, manage your subscription (RevenueCat Customer Center: cancel, refund, plan changes), and restore purchases.
- Language — Acrea is translated into 11 languages (English, Arabic, German, Spanish, Filipino, French, Hindi, Indonesian, Italian, Portuguese, Vietnamese).
- Appearance — System, Light, or Dark theme.
- About — app info and the Scope & disclaimer (accuracy notes and legal scope).
- Privacy & legal — Privacy Policy and Terms of Use.
- Data management — Delete all data (with confirmation).
Free vs Acrea Pro
Acrea is free to use for everyday measuring and organising. Acrea Pro unlocks the professional toolkit, the Mapbox map engine and offline maps, and removes the saved-measurement cap. When you tap a locked tool, Acrea shows a preview of what it does and a path to upgrade — you can always back out, so free users are never trapped.
Free
Free- Tap-to-measure (area & distance)
- Drop GPS points with averaging
- Google base maps (satellite, aerial, terrain, standard)
- Search, place details, saved places & directions
- Save measurements (up to the free cap)
- Categories & saved-sites overlay
- Rename, notes, duplicate, delete
- Distance labels, segments & closure
- Import from KML/KMZ/GeoJSON/CSV/DXF/Shapefile
- Export to all six formats, single or bulk
- Backup & restore your whole portfolio
- Recently deleted — 90 days to undo a delete
- Share a branded map image
- Share a public link to a measurement, place or group (coming soon)
- 11 languages, light/dark themes
Acrea Pro
Pro- Unlimited saved measurements
- Walk-to-measure (GPS perimeter recording)
- Mapbox map engine & premium styles
- Offline map downloads & field use
- COGO traverse legs
- Precise coordinate entry
- Curved edges (arcs), cut-outs (holes) & angle indicators
- Field compass overlay
- Move, Split, Auto-split, Merge, Trim
- Groups (create, recolour, ungroup)
- PDF report builder & legal description
- Cloud sync across your devices (coming soon)
- Teams — a shared workspace for your crew (coming soon)
Manage or restore your subscription anytime from Settings → Membership.